Lazy Loading and Eager Loading; are the two major techniques used for loading the resource on a website, and like every other thing, they have their advantages and disadvantages.
But when you are working on your website, it can be confusing on which of these loading techniques need to be used to improve the performance of your website. So I will be explaining these two techniques to you in this article, what you gain from using any of them and when to use them.
You get to know the best ways to use this technique for the best web performance. Let’s start this off with some definition.
What is Lazy Loading?
Lazy loading is a technique that loads a website’s resources by deferring the loading of non-critical resources at the beginning of a page load time.
This is a technique that you can use to prevent a browser from loading non-critical resources on your webpage when it begins to render the page. The browser will only load these deferred resources when they are needed.
Note: Lazy loading is applied to only non-critical resources on a webpage and not all the resources on the page. But what are non-critical resources?
To clear this with a simple definition, Critical resources are those needed immediately after the page begins to load, while Non-critical resources are not immediately required; this includes elements on the page that are below the fold (not in the user’s viewpoint).
When Do I use Lazy Loading?
Lazy Loading is best used when you have a heavy-weight website filled with so many heavy resources like images, videos, GIFs, third-party embeds, and so on. This is the case for most e-commerce websites.
Due to the fact that loading all these resources at once will take so long and increase the page load time of the website, you can use lazy loading and defer the loading of the resources that are considered to be non-critical.
So when a browser wants to load the page, it will only load the resource in its viewpoint because those are the resources you set as critical, and anyone below the viewpoint is left out. It will only load the other non-critical resources when the user scrolls down to the page holder for those resources.
This is the major reason why the Lazy Loading technique was developed: to improve the page load time of webpages with lots of heavy resources. If this sounds like your website, then you need to use Lazy Load instead of Eager Load. But what is Eager Loading?
NOTE: When loading the resource on your website, it is best you use the technique that will offer you good performance with the type of resource you have on your website, and so it is essential to know when to use a technique or not.
What is Eager Loading?
Eager Loading is the opposite of Lazy Loading. It is a technique that involves the loading of all the resources on a webpage at once. This is the default loading setting for most websites.
With the eager loading technique, all the critical and non-critical resources are loaded all at once, and a browser renders them all when opening the page. None of the resources is deferred to load as a user scrolls.
When Do I use Eager Loading?
It is best to use the eager loading when you have a light website with few resources. For example, a blog mainly contains texts, a few images, and sometimes one or two videos or GIFs.
Since these resources on the webpage are light in weight, loading all of them at once wouldn’t take so long, and if the resources are well optimized, the webpage could still load completely in 3 seconds or less.
An example of a website that uses the Eager loading is Wikipedia; they do this because the website is mainly filled with text files and some images, so there is no need to lazy load any resource when they can load them all at once.
So when using eager loading on your website, ensure that the webpage is light and the resources on the page can completely load together in 3 seconds or less. If this is possible, only then should you use Eager Loading.
Lazy Loading VS Eager Loading – Differences Between Them.
Lazy Loading and Eager Loading are two different loading techniques, and from the definition of both of them, the difference is clear.
The Eager Loading technique loads all the elements or resources on a webpage at once, while the Lazy Loading technique does the opposite. It instead loads the webpage’s element – like it is lazy – by deferring some of the elements to load later and loading only the necessary ones.
With the eager loading, all the resources are downloaded and rendered by a browser at once, so the request for them is sent at once, but if this request is so much, it will take a long time to be executed. This is why I advise that you use eager loading for light pages on your website.
But for Lazy Loading, only the request for the critical resources is sent first. As the users scroll and navigate the page, the request for the other resource will be sent, and this results in sending different requests at different time intervals depending on what the user does on the page.
These are the major differences between these two loading techniques. Depending on your website structure, you need to choose which of these two loading techniques will make your website’s User Experience (UX) good.
Benefit Of Eager Loading.
Now you know what eager loading is, how different it is from lazy loading and when you should use it on your website. I want you to know what you stand to benefit from using Eager loading on your website.
NOTE: You only gain this benefit when you use eager loading with the right pages on your website. Click here to find out when to use eager loading if you don’t know it yet.
All Requests Are Sent At Once:
After reading to this point, you should know that with the eager loading, all the requests for a web page’s resources are all sent at once and not severally on demand.
Well, this is a good thing if your webpage has a lot of text and few images making it light enough to load in 3 seconds.
Since all requests are sent at once, the user is free to interact with the page throughout its lifespan as there will be no request for another resource later on. Also, the little resources on the page are all loaded completely.
Unlike lazy loading, when you use eager loading, the user does not have to wait for any image or video to load when they scroll to it before they can view it, especially when there is a change in network condition.
Note: when using the lazy loading techniques, there is a solution to the above stated problem. Click here to find out.
Benefits of Lazy Loading.
Just as you benefit from using Eager Loading the right way, you also benefit from using Lazy loading the right way on your website.
Deferring the loading of non-critical resources gives you access to the following benefits:
- It improves the website speed.
- It improves LCP.
- It reduces data waste.
- It reduces the waste of a user’s system resources.
1. It Improves The Website Speed:
The use of Lazy Loading on your website can improve its initial speed, and this is possible because when the page is loading, only the part of the website that is considered to be critical is loaded, and the rest of it is left aside. This results in faster load time and a better experience for your users.
By this, a website with lots of images and videos can load in 3 seconds and become interactive, while the other resources will load as the user scrolls down to their position.
2. It Improves LCP:
Largest Contentful Paint(LCP), one of the three Core Web Vital metrics, which measure how fast the largest element or resource on your webpages loads, can be improved by using the lazy loading technique. Well, this is only possible if you use this technique properly.
For more information on using the Lazy Loading technique properly, click here. But basically, ensure that the largest element on your webpage is not on Lazy Load. If this is taken care of, this technique will help improve your LCP score.
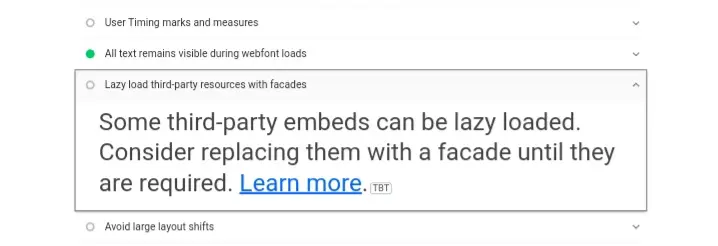
Aside from the Largest Contentful Paint, Lazy loading can assist in improving any metric related to your website’s speed. Google Lighthouse also recommends using the lazy loading technique for your third-party embeds and considering replacing them with a façade until required.
3. It Reduces Data Waste:
Using the lazy loading technique on your website not only benefits you but your users also benefit from this as it helps reduce the data plans the user will use in downloading your website.
Since the user’s browser only have to load the critical resources, the data connection used will be much less than when it is to load the page’s entire resource. This saves the user’s data, especially when using a limited data plan.
Also, in most cases, what the user needs from your website might just be above the fold, and all they have to do is click on that button and move to the next page. But if the browser loads the complete resource on the page, the resources below the fold become a waste to such a user as they do not need them.
4. It reduces the waste of a user’s system resources:
When a user clicks to load a webpage, there are many things going on from that point. Apart from the browser sending a request and getting a response, the user’s device is also at work all through the process.
The device memory, battery, and other system resources are used, and the more weight your website has, the more of these resources will be used when loading it.
With lazy loading, you can cut down the consumption of these resources as only a portion of your website will be loaded, and the others won’t load except if the user needs it and scrolls to view them.
Lazy Load Best Practices.
Although the use of Lazy loading on your website gives you access to the benefits listed above, it can also affect your website if it is not used properly.
You need to note the following when using the Lazy Loading technique:
- Do not Lazy load element above the fold.
- Ensure it does not affect Search Engines Access.
- Distance from viewpoint threshold.
1. Do not Lazy load element above the fold:
For most websites, the largest element on its pages is always above the fold and visible to a user without scrolling. Various metrics use these elements in evaluating a website’s performance.
An example of a metric that uses these elements/resources is the Largest Contentful Paint (LCP), which measures how fast a browser loads the largest element on a webpage. This metric score can be affected by the lazy loading technique.
If the largest element on your website is on lazy load, then a browser will defer the loading of the element and won’t load it as fast as it should, influencing your LCP score. So it is best you avoid lazy loading elements above the fold.
The elements of your website that are visible above the fold vary on different devices, so you need to check your website on different devices and see the range of your website element that is above the fold for the device with the largest viewpoint and use that to know where you need to start lazy loading.
2. Ensure it does not affect Search Engines access:
Suppose the element on your web pages are on lazy load; when a Search Engine Bot renders the pages to understand its content, the element on lazy load might not be rendered at all, and this prevents Search Engines from accessing the complete content on your website.
You don’t want this to happen as it can influence your ranking position in the SERP, so you need to use lazy loading in a way that Search Engines Bots can still access the contents on lazy load.
To help you achieve that, Google Search Central has an article explaining how you need to implement lazy loading on your website and prevent it from hiding content from Google Bot. But the major thing is to ensure that you load content as soon as it is in the viewpoint and support paginated loading for infinite scroll.
3. Distance From Viewpoint Threshold:
With the benefit the lazy loading technique has, it can affect your user experience if this happens: A user scrolls, and when an image or video is above the fold, they have to wait for a long time before it loads just because they weren’t loaded from the beginning.
To prevent this from happening, you need to set a Distance From Viewpoint Threshold. When this is set, as users begin to scroll, all resources from the set distance below the fold will start to load even before they get to the viewpoint. So before they get to the viewpoint, they would have loaded completely, and the users no longer have to wait.
The Distance Form Viewpoint Threshold is set as default when you are using browser level Image Lazy loading, and Chromium has its settings for different connection types. But if you are to use JavaScript, you might have to set your distance from the viewpoint threshold, and you can use that from Chromium as a guide.
After going through this article to this point, you should be clear now on what loading technique you need to use for your website. But one thing I am yet to explain to you is how to implement these techniques.
Well, eager loading is the default loading technique that is used for most websites, and you don’t have to do anything to implement this technique, but the lazy loading technique is different from the eager loading technique as you have to put things in place in other to use this technique.
How To Implement The Lazy Loading Technique.
When implementing Lazy Loading on your website, you need to pick a method which will be supported in the browser that your users are using to open your web pages so as to avoid a poor experience.
The different ways of implementing lazy loading include:
1. Browser Level Lazy Loading:
Browser Level Lazy Loading allows you to implement the lazy loading technique on your website from the browser, but this is only supported in a few browsers, including Chrome, Edge, Firefox Opera, Samsung Internet browser, and so on.
<script data-feature="loading-lazy-attr" defer src="https://cdn.caniusewidgets.com/scripts/overviewtable.js"></script>With the browser level lazy loading, all you need do is to use the loading attribute to defer the loading of all off-screen resources completely, but this works only for images now.
<img src=“image.webp” loading=“lazy” alt=“this is an image” width=“200” height=“200”>In the above example, the loading attribute is used and is equated to the keyword “lazy,” and this implements the lazy loading technique.
You can also equate the loading attribute to the keyword “eager,” which will implement the eager loading technique, or “auto,” which will pick a loading technique automatically, and most times, the eager loading is used.
2. Lazy Loading Images:
When it comes to lazy loading images, you can use the browser level lazy loading, but just for the other browser that does not support this, you need another way to get this done.
To lazy load Inline Images, i.e., images that are in line with your webpage content, you can use the Intersection Observer, but this is still not supported in all browsers. Another way to get this done is to use scroll and resize event handlers.
For lazy loading images in CSS, which are set as the background-image property, you can not use the browser-level lazy loading for this. You would need to rely on speculative behaviours of CSS to lazy load the image. For example:
<div class="lazy-background">
<h1>Here's a hero heading to get your attention!</h1>
<p>Here's hero copy to convince you to buy a thing!</p>
<a href="/buy-a-thing">Buy a thing!</a>
</div>
The large hero background image used above will only load when it is in the viewpoint of a user’s device and not load initially.
3. Lazy Loading Videos:
When lazy loading videos, you need to know the use case the <video> tag has because different use cases require different solutions.
If the video is not set to auto play, but the user will have to initiate the video, then you can use the preload attribute as shown below:
<video controls preload="none" poster="one-does-not-simply-placeholder.jpg">
<source src="one-does-not-simply.webm" type="video/webm">
<source src="one-does-not-simply.mp4" type="video/mp4">
</video>
The preload attribute will prevent a browser from loading any video data, not until the user needs it and click on it.
For videos acting as an animated GIF replacement, lazy loading videos like this can be done with this:
<video class="lazy" autoplay muted loop playsinline width="610" height="254" poster="one-does-not-simply.jpg">
<source data-src="one-does-not-simply.webm" type="video/webm"> <source data-src="one-does-not-simply.mp4" type="video/mp4"> </video>
4. Lazy Loading Libraries:
Another way of implementing the lazy loading technique is by using the lazy loading libraries, and there are so many libraries you can use on your website.
Vanilla-lazyload is a lightweight library you can use to lazy load both images and videos on your website, and it works using the intersection Observer.
Lozad.js is another option you can go for, and it works just like the vanilla-lazyload library. They are both supported in older browsers and not just the modern browsers.
Conclusion.
Lazy Loading and Eager loading are beneficial loading techniques you can use on your website, but choosing which one to use will depend on your website weight. I did explain to you which loading works best for heavy websites and light websites.
To improve your website performance, you have to use the proper loading technique, and by now, I believe you are clear on what loading technique is appropriate for your website.
Go ahead and implement it on your website (if it is lazy loading for you); only then can you benefit from it.
Whether you are loading an image, videos, ads, or any third-party embeds, load them with your user experience in mind.
Good Luck.